IDA server (aka “Potato”)
currently at 147.32.83.171, potato.felk.cvut.cz soon.
Installed software
docker |
20.10.11 |
docker-compose |
2.6.1 |
cuda |
11.4 |
mc |
4.8.24 |
(Should you need anything else, let me know through github issues here.)
SSH keys
For server access you need to generate your own ssh keypair. Follow instructions here:
https://www.ssh.com/academy/ssh/keygen
choose any algorith, for example:
ssh-keygen -t rsa -b 4096
(email, name, passphrase … are not needed). Send me the generated public key e.g. id_rsa.pub.
SSH config
To make our lives easier, we’ll add potato into ssh config file ~/.ssh/config ,(create if it is not there) as follows:
Host potato
HostName 147.32.83.171
User uhrinmat
Port 22
IdentityFile ~/.ssh/ida-uhrinmat
where ida-uhrinmat is your private key. The following should then work.
ssh uhrinmat@potato
SSH tunnel
Server is currently firewalled in a way that you can only reach the server through ssh. Hence, whenever you need to run an app where you need more than simple CLI interaction e.g. mlflow, jupyterlab… you need to “expose” it through a tunnel.
Example: ssh tunnel for postgres running on the server’s localhost:5432. We want to make this postgres accessible on our localhost:1111.
ssh -N -L 1111:localhost:5432 uhrinmat@potato
this keeps the ssh tunnel open until you close the terminal.
Docker
Sure, you can easily set your environment through conda and run your code directly. However, conda often isn’t as portable as one would hope. Most likely outcome when porting a project using pure conda onto clusters is the following process:
solving environment for 15 minutes
fails
solving conflicts for 45 minutes
try removing conflicting packages by hand
go to 1.
Hence a better idea might be to use a Dockerfile.
NOTE: Using docker for dependency management will allow you to easily port between different clusters. As an example you can use the Dockerfile below:
ARG BASE_IMAGE=python:3.8

FROM ${BASE_IMAGE} as base

# Use the opt directory as our dev directory
WORKDIR /opt

ENV PYTHONUNBUFFERED TRUE

COPY requirements.dev .

# Install python dependencies
RUN pip install --upgrade pip \
    && pip install --no-cache-dir wheel \
    && pip install --no-cache-dir -r requirements.dev \
    && pip list
Where requirements.dev is your typical requirements.txt file.
NOTE: pip is a better idea for dockerfiles as conda blows up the image size substantially. But conda is doable as well. For more options check the provided links below.
Now we only need to build our dockerfile, tag it as dev environment and then run it. The docker run command below attaches the current LOCAL working directory ($pwd$) to /opt directory INSIDE the docker container.
docker build -t dev -f Dockerfile .
docker run  --cpus=8 --memory=32GB --rm -it --name dev-env -v $(pwd):/opt -t dev bash
NOTE: We restrict the maximum available resources with –cpus and –memory params. Complete set of options such as gpus… can be found here.
This should open up a bash command line inside the docker container and we can simply run whatever we intended.
root@0267b5398a62:/opt# python train_pytorch.py
You can easily set up any IDE for any programming language to use this docker container to run your scripts, this way your dev environment stays consistent and somewhat portable.
E.G. Pycharm: CTRL-shift-a -> Switch python interpreter -> Add Interpreter -> Docker -> Image name = dev -> Add
NOTE: Full docker example for project/dependency management with tests and more:
also a good read for python env management:
https://yxtay.github.io/blog/python-environment-package-dependency-management/
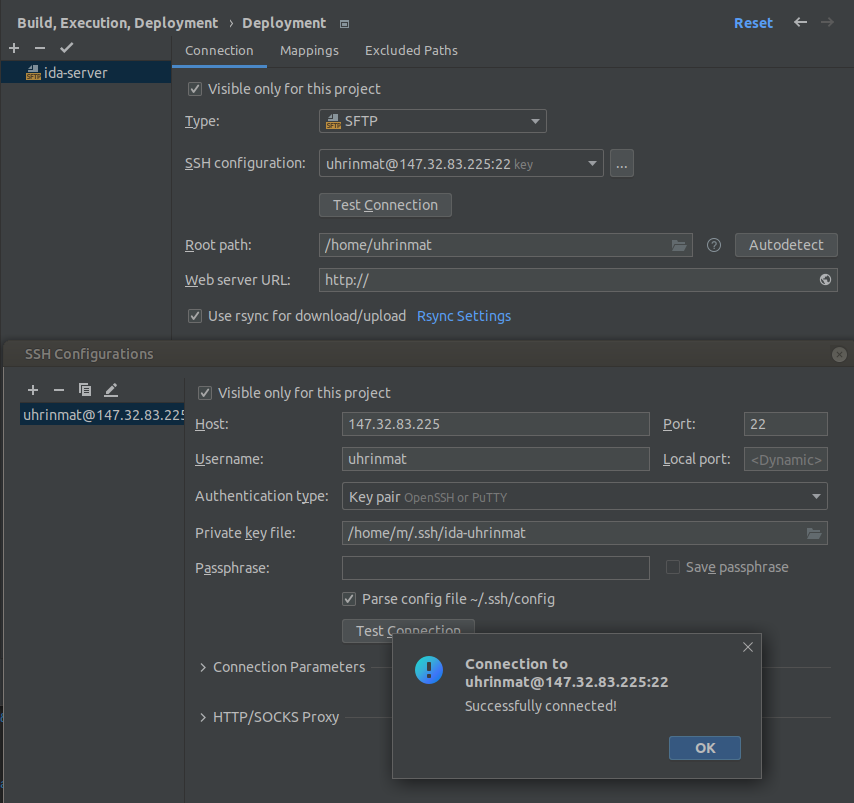
PyCharm remote host
Another option is to use pycharm as a SFTP client: Tools>Deployment>Browse Remote Host
Add remote host through ssh, sftp there. All else should be straightforward.
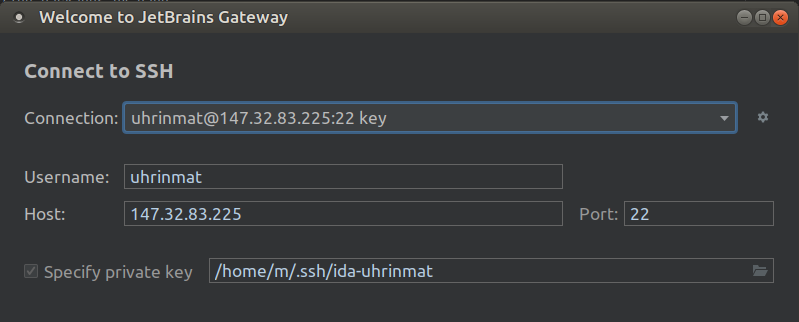
Jetbrains gateway (beta)
Git clone your project into your home directory on the server and then setting up gateway connection should be pretty straightforward.
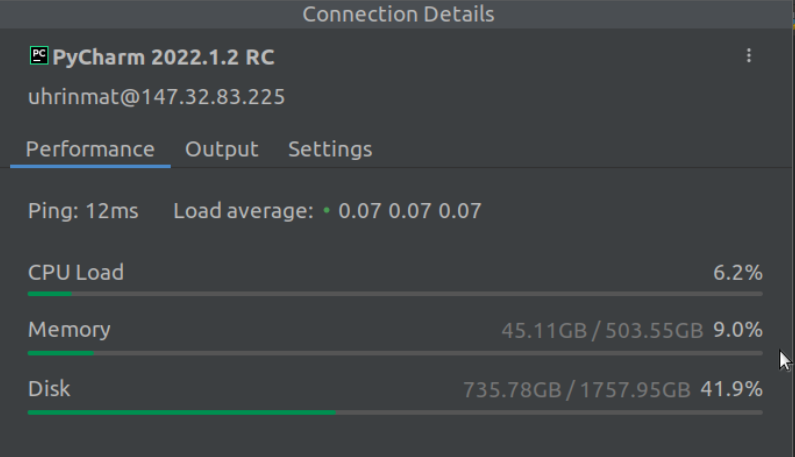
When the connection is set up you should be able to see the following performance monitoring when you click on the conn.
What I found is that jetbrains often leaves zombie processes such as “JetBrains/RemoteDev” running on the server even after stopping the python script and closing connection, especially when debugging. Hence you might need to do the following when exiting the remote connection.
$ htop
$ pkill jetbrains -U uhrinmat
Check if any JetBrains processes running with htop and pkill them with a username specified.
MLFlow
https://mlflow.org/ is an open source platform for the machine learning lifecycle.
To use it in your code, simply set environment variable MLFLOW_TRACKING_URI to
http://host.docker.internal:2222 if you are running in Docker + configure extra hosts for your container host.docker.internal:host-gateway
http://localhost:2222 if you are running without the docker
To open the MLFlow UI, port-forward port 2222 to your computer and open http://localhost:2222.
Example code snippet:
import os
import mlflow

# Set env. variable programatically.
os.environ['MLFLOW_TRACKING_URI'] = 'http://localhost:2222'

# Set your experiment name, I recommend one per project per person, e.g. something like "NMLN - peterjung"
mlflow.set_experiment('Potato Test')

# Start run
with mlflow.start_run(run_name='Test Run') as run:
    # Log some things. See MLFlow's documentation for all the possibilities.
    mlflow.log_metric('metric', 0.22)
    mlflow.log_param('param', 22)

NOTE: We are running a (beta) server on Potato, it’s considered beta because:
it’s using sqlite database stored as a single file on Potato’s disk
artifacts (uploaded files) are stored locally on Potato’disk as well
That means there is no backup and you are filling space on Potato. If it becomes a problem, we can deal with a more robust deployment solution.
Deployment repository is https://github.com/nmln-team/mlflow/, there is /etc/systemd/system/docker-compose-mlflow.service to start it up with docker automatically as a service.
Syncing files between your localhost and potato
To copy a single or a few files you can use ‘scp’.
From potato to localhost:
scp -r "peter@potato:~/projects/nmln-torch/poetry.lock" .
From localhost to potato:
scp -r poetry.lock "peter@potato:~/projects/nmln-torch/poetry.lock"
But to synchronize entire folders with only small changes, rsync will be way faster.
From potato to localhost:
rsync -avzurb --no-perms --del --backup-dir .backup --exclude '.git' "potato":"~/projects/nmln-torch/" .
From localhost to potato:
rsync -avzurb --no-perms --del --backup-dir .backup . "potato":"~/projects/nmln-torch/"
With these rsync commands, anything that was deleted or overriden will be backuped in .backup directory, so you don’t need to worry about accidentaly lossing your files.